I. Introduction
Welcome to the world of DIY home improvement, where the innovative charm of laminate flooring installation awaits you. Laminate flooring not only adds modern elegance to your space, but it is also a cost-effective alternative to traditional flooring. This step-by-step guide is designed to enhance your travel experience and transform your living space into a testament to your craftsmanship. Get creative and improve the aesthetic appeal of your home by learning about DIY laminate flooring techniques. Let’s begin this rewarding adventure together, step by step.
A. Laminate Overview
Laminate is a versatile and economical option that mimics the look of wood or tile. Made of multiple layers, it’s durable and easy to clean, making it a popular choice for homeowners who value style and practicality.
B. The Importance of DIY Home Improvement Projects
Participating in DIY projects not only gives you a sense of accomplishment, but also allows you to personalize your living space. Through real-life experiences, we create a deeper connection with your home, providing a satisfying journey that goes beyond the end result. In the home improvement industry, DIY projects bring creativity, cost savings, and a unique feel to your surroundings.
II. Materials And Tools
A. List of required materials
1. laminate floor planks
2. Substrate
3. Transition strip
4. Skirting boards and moldings
5. Adhesive or vapor barrier (if required)
6. spacer
7. Tap and pull the block.
8. Circular saw or nail saw.
9. Measure with a tape measure.
10. Pencil and chalk lines.
B. Basic tools for your project
1. Circular saw or nail saw.
2. Threaded blocks and rods.
3. Spacer to maintain expansion gap.
4. Hammer or rubber mallet.
5. Tape measure and square measure for accuracy
6. Carpenter’s knee pads for comfort and protection.
7. Protective equipment: gloves and safety glasses.
8. Vacuum cleaner or broom for cleaning.
9. Level to check if the floor is level.
10. Chalk lines for layout accuracy.
III. prepare space
A. Indoor measurements
1. Measure the length and width of your room to determine the area needed to install laminate flooring.
2. Consider niches, closets, and uneven shapes in the room.
B. Demolition of Existing Floor
1. Clear the space by removing furniture or obstacles.
2. Carefully remove the floor covering, if present, and ensure the floor is clean and level.
C. Inspection And Preparation Of Subfloor
1. Check the level and structural integrity of the subfloor.
2. Eliminate creaks, protruding nails and uneven surfaces.
3. Make sure the subfloor is dry and clean. Address moisture issues before proceeding with installation.
IV. Laminate Selection
A. Explore Different Laminate Options
1. Consider the different styles, colors, and finishes of laminate flooring.
2. Evaluate thickness and abrasion resistance considering the movement of the room.
B. Calculate The Amount Required
1. Measure the length and width of your room and multiply by square meters.
2. Typically allow for additional waste of 5-10% more than the calculated area.
C. Consider Substrate Options
1. Understand the importance of underlayment for sound absorption and moisture protection.
2. Select the appropriate underlayment for your specific floor and subfloor type.
V. Floor Adaptation
A. The Importance Of Adaptation
1. Emphasize the importance of adapting laminate to indoor conditions.
2. It explains that adapting to the environment minimizes the risk of expansion or contraction after installation.
B. Period and Procedure
1. Please specify the adaptation period recommended by the manufacturer.
2. It explains the process of laying plywood planks in a room to allow it to adapt to temperature and humidity levels.
VI. Installation Process
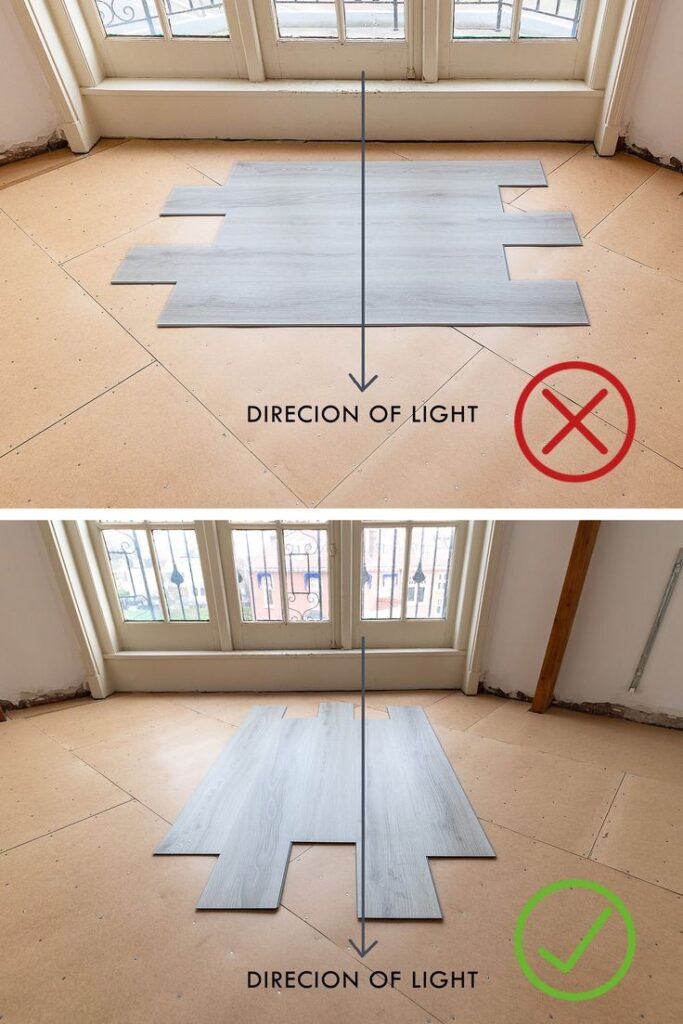
A. Starting Point and Layout Considerations
1. Choose the starting point strategically, often along the longest wall.
2. Plan your layout to avoid small, narrow rows and ensure a balanced look.
B. Step-by-step installation guide
1. Describe the mechanism for joining laminate boards.
2. Provide a detailed walk through of each installation step, emphasizing proper alignment and snug connections.
3. Highlight the importance of staggering plank joints for a natural look.
vbnet Copy code
Example:
- Align the tongue and groove correctly.
- Use spacers to maintain expansion gaps.
- Secure the planks by tapping the short end with a tapping block and mallet.
C. Cutting and Fitting
1. Guide on measuring and cutting planks to fit around doorways, vents, or irregular shapes.
2. Emphasizes the precision required to achieve professional results.
VII. Conversion Processing
A. Installation Of Transition Strips
1. Identify areas that require transition strips, such as doorways or transitions between rooms.
2. Explain the purpose of a transition strip: To provide a seamless, aesthetically pleasing connection between different floor coverings.
B. Handling entrance and exit and movement between rooms
1. Provide recommendations for trimming door jambs to ensure a smooth transition.
2. Detail transitions between rooms to ensure a cohesive look and account for potential differences in floor heights.
Ⅷ. Finishing Work
A. Trim and Molding Installation
1. We offer a variety of trim types and molding options for the perfect look.
2. Installation instructions for skirting boards, cornices and other finishing elements.
B. Filling Gaps and Seams
1. Instructions on how to fill small gaps between floor and wall with the appropriate color sealant.
2. Emphasize the importance of eliminating extended white space and maintaining a consistent look and feel.
C. Laminate floor cleaning and maintenance
1. Provide regular cleaning tips to extend the life of your flooring.
2. Recommend suitable cleaning products and methods, paying particular attention to preventing excessive moisture.
Ⅸ. Problem Solving
A. Common Problems During Installation
1. Identify potential problems, such as uneven flooring or misaligned boards.
2. We provide solutions to resolve these issues to ensure a smooth installation process.
B. Tips for troubleshooting
1. Provides troubleshooting tips, such as pulling tight spots or adjusting board alignment.
2. Emphasize the importance of resolving problems quickly to prevent long-term problems.
X. Conclusion
A.Recap of Key Steps
1. Summarize the critical steps in installing laminate flooring.
2. Reinforce the importance of careful planning and precise execution.
B. Encouraging home craftsmen
1. Build confidence by recognizing the completion of DIY projects.
2. Encourage your readers to enjoy and appreciate their newly transformed space by showing off your personal touches. Start your journey by learning new skills and enjoying beautifully installed laminate flooring, turning your home into a testament to DIY craftsmanship.
XI. Additional Resources
A. Links and recommended books
1. Provides resources for further understanding of laminate flooring types, care and troubleshooting.
2. Include reputable publications or websites that provide detailed information.
B. Online tutorials and videos for additional help
1. We recommend online platforms or video tutorials that show the installation process.
2. Encourage DIYers to use visual resources for additional guidance and ideas.